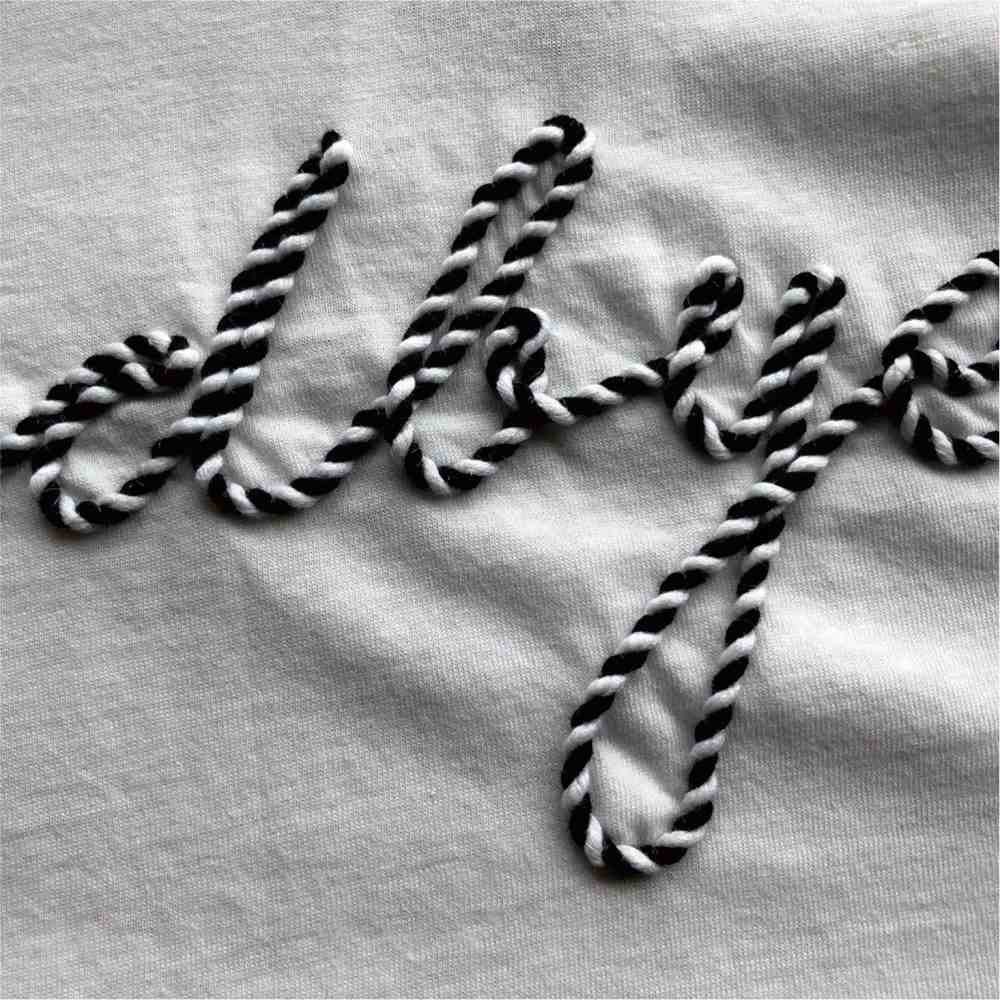
Yes, you can embroider directly on a sweatshirt — it is one of the most popular ways to add custom, personalized style to casual wear. Whether stitched by hand or machine, embroidery creates durable, textured designs that stand out on fleece and cotton-blend sweatshirts. The key to clean, long-lasting results is choosing the right fabric, using proper stabilizer, and securing the fabric taut to prevent puckering and distortion.
For custom and professional designs, brands like JINMAO offer a range of creative embroidery styles from classic flat stitching to 3D puff finishes, making embroidered sweatshirts accessible for all skill levels and style preferences.
Key Takeaways
- Cotton and cotton-poly blend sweatshirts work best for embroidery, as they hold stitches well and minimize puckering.
- Always use a stabilizer and embroidery hoop to keep fabric taut; cut-away stabilizer is the most reliable choice for stretchy sweatshirt material.
- Start with simple, small designs placed on the chest, cuff, or back for clean, beginner-friendly results.
- Pre-wash sweatshirts in cold water before embroidering to prevent shrinkage from warping your finished design.
- Basic hand stitches like backstitch and satin stitch are perfect for beginners to create clean, custom patterns.
What You Need for Sweatshirt Embroidery
Choosing the Right Sweatshirt
Fabric type directly affects how well embroidery turns out:
- Cotton or 50/50 cotton-poly blends: The best all-around choice. Soft, durable and resistant to puckering, with enough structure to hold stitches firmly.
- Heavy fleece (300+ GSM): Ideal for raised 3D or puff embroidery, as the thick base supports textured designs.
- High-pile fabrics (terry, sherpa): Not recommended for fine detail work, as the fuzzy surface hides small stitches. Simple, bold designs work best on these materials.
Essential Tools
- Embroidery needle: Size 5–7 for hand embroidery; size 80 machine needles work for most standard sweatshirt fabrics.
- Embroidery floss/thread: 40 wt polyester thread for machine embroidery; standard 6-strand cotton floss for hand work.
- Embroidery scissors: Small, sharp scissors for trimming threads cleanly.
- Marking tool: Water-soluble pen or heat-erasable pen for tracing designs onto fabric.
- Embroidery hoop: Holds fabric taut to prevent shifting and puckering. Match hoop size to your design size.
Stabilizer Options
Stabilizer is the most important supply for clean sweatshirt embroidery. It reinforces stretchy fleece fabric and keeps stitches smooth.
| Stabilizer Type | Best For | Notes |
|---|---|---|
| Cut-away | Most sweatshirt embroidery, detailed designs | Most durable option; stays in place permanently to prevent puckering over time |
| Tear-away | Simple, light designs | Easy to remove after stitching; best for low-stretch fabrics |
| Wash-away (water-soluble) | Delicate designs, top-side stabilization | Dissolves completely with water; leaves no residue on the finished piece |
Tip: Apply temporary adhesive spray to attach stabilizer to the inside of the sweatshirt for extra security during stitching.
Step-by-Step Guide to Embroidering a Sweatshirt

1. Choose Your Design & Placement
Pick a design that matches your skill level. Beginners should start with simple outlines, small logos, or short text. Popular placement options include:
- Left or right chest (classic, polished look)
- Center chest or full back (for larger statement designs)
- Cuffs, sleeve hems or hood (small accent details)
Make sure the design is scaled appropriately for the sweatshirt size — avoid overly large patterns that can warp on stretchy fabric.
2. Prep the Fabric
Pre-wash the sweatshirt in cold water and tumble dry on low heat before you start stitching. This removes any shrinkage that would warp your design later. Turn the sweatshirt inside out when washing to protect the outer surface, and lay it flat to dry to avoid stretching.
3. Transfer Your Design
There are several easy ways to transfer a pattern onto a sweatshirt:
- Water-soluble stabilizer: Print or trace your design onto the stabilizer, stick it to the fabric, stitch through it, then rinse away with water. Best for dark or textured fabric.
- Carbon paper tracing: Place carbon paper between the design and fabric, then trace the pattern with a pen. Works well for light-colored smooth sweatshirts.
- Iron-on transfers: Pre-printed transfer sheets that press onto fabric with heat. Fast and beginner-friendly for simple designs.
4. Stitch Your Design
Secure the sweatshirt and stabilizer in an embroidery hoop, pulling the fabric taut but not stretched. You can embroider by hand or with a machine:
| Hand Embroidery | Machine Embroidery | |
|---|---|---|
| Best for | One-of-a-kind, personal projects | Bulk orders, precise logos, complex designs |
| Setup | Fast — just trace and start stitching | Requires digitized design files and machine calibration |
| Finish | Unique, handmade, slightly organic look | Uniform, precise, consistent stitches |
| Speed | Slow, best for small designs | Fast, efficient for large or repeated patterns |
For beginners starting with hand embroidery, master these basic stitches first:
- Backstitch: Creates clean, solid outlines, ideal for lettering, names and shape borders.
- Satin stitch: Fills in small shapes with smooth, flat thread coverage.
- French knots: Makes small raised dots for details like eyes or decorative accents.
5. Finish & Secure Stitches
When stitching is complete, tie off all thread ends on the back of the sweatshirt and trim excess thread. Remove any excess stabilizer according to the product instructions. For wash-away stabilizer, rinse the inside of the sweatshirt with cool water until all residue dissolves.
Common Beginner Embroidery Mistakes to Avoid on Sweatshirts
Embroidery on sweatshirts can look simple at first, but beginners often run into a few common issues that affect the final result. Most of these problems come from fabric movement, thread handling, or small finishing errors that could have been prevented with the right setup.
Fabric Puckering & Distortion
One of the most common issues is fabric puckering, especially when working with stretchy fleece or thick sweatshirt material. Because the fabric naturally has some give, it can easily shift during stitching if it isn’t properly stabilized.
To avoid this, always use a cut-away stabilizer, which helps keep the fabric structure stable throughout the embroidery process. When hooping, make sure the fabric is held firm and even, but not stretched too tightly, as over-tensioning can distort the design. It’s also important not to remove the hoop before the stitching is fully completed, since early removal can cause the fabric to lose alignment.
Thread Tangle & Breakage
Thread problems such as tangling or breaking are usually related to tension settings or machine cleanliness. Before starting your actual design, it’s a good idea to run a test stitch on a scrap piece of the same fabric to check how the thread behaves.
If you are using a machine, make sure to regularly clean lint around the needle and tension area, as buildup can cause unnecessary friction. For specialty threads like metallic or slick embroidery thread, a thread conditioner can help improve smoothness and reduce breakage during stitching.
Fixing Small Errors
Even with careful preparation, small stitching mistakes can still happen. The key is to fix them gently without damaging the fabric. A stitch ripper can be used to remove minor mis-stitches, but it should be done slowly, especially on fleece materials which can snag easily.
In some cases, small errors don’t need to be fully removed at all. They can often be disguised by adding a few extra stitches or creatively incorporating a small patch or decorative element into the design.
Conclusion
Embroidering directly on a sweatshirt is an easy, rewarding way to create custom, one-of-a-kind casual wear. With the right fabric, proper stabilizer and a few basic tools, even beginners can achieve clean, long-lasting results by hand or machine.
For professional, high-quality custom embroidery, JINMAO offers a full range of techniques including flat embroidery, 3D puff, sequin details and patch appliqué. With strict quality control from material inspection to final finishing, they deliver consistent, durable designs for both individual pieces and bulk orders.
FAQ
Can you use any type of sweatshirt for embroidery?
Most sweatshirts work for embroidery, but cotton and cotton-poly blends deliver the best results. Thick, stable fleece holds stitches well. High-pile fuzzy fabrics can hide small details, so stick to bold, simple designs on those materials.
What is the best way to keep embroidery from puckering?
Use a cut-away stabilizer on the back of the fabric, and secure the sweatshirt tightly in an embroidery hoop. Always test your setup on a scrap piece of the same fabric first.
How do you wash a sweatshirt with embroidery?
Turn the garment inside out, wash on a gentle cold-water cycle, and lay flat to air dry. This prevents fading, thread fraying and fabric shrinkage.
Can beginners try embroidery on sweatshirts?
Yes. Beginners should start with simple outline designs, basic stitches, and practice on scrap fabric first. Both hand and machine embroidery work well for learning — start small and build up to more complex patterns.